
In this first post of the series we create the index functionality for a CRUD based user management single page application (SPA) utilizing Laravel and React.
Series posts
Posts in this series:
- Part one - Initial setup with user accounts data table
- Part two - Adding the ability to create new users
- Part three - Adding the ability to edit existing users
- Part four - Adding the ability to delete existing users
With more to follow…
Prerequisites and assumptions
For this post I assume you’re using the Application Template created in previous posts. You can find the series here:
- Creating a Base Laravel Project Template Part One
- Deploying Multiple Laravel Projects Remotely on Linux
If this isn’t the case you’ll likely need to slightly modify some of the commands below to match your setup.
You can also find the source code for this post here.
With that out of the way let’s get started!
Create Laravel assets
To start we’ll create the Laravel assets needed to support the React components.
Database
Let’s go ahead and setup the database. We’ll utilize MySQL in this instance. Start by executing the command sudo mysql on the command line and enter the following statements:
CREATE DATABASE user_manager;
GRANT ALL PRIVILEGES ON user_manager.* TO 'app_template'@'localhost';
FLUSH PRIVILEGES;
quit;
Next ensure the Laravel .env file is configured to work with the new database:
APP_NAME='Application Template - React User Manager'
APP_ENV=local
APP_KEY=base64:WVOLcnrIHJebzm3WOexSohpDxYN/3tlMx4YnGss65FY=
APP_DEBUG=true
APP_URL=http://localhost

LOG_CHANNEL=stack

DB_CONNECTION=mysql
DB_HOST=127.0.0.1
DB_PORT=3306
DB_DATABASE=user_manager
DB_USERNAME=app_template
DB_PASSWORD=!app_template!
And finally we want to apply the migrations and seed the database:
php artisan migrate:refresh --seed
Routing
Next we’ll add the route for the React single page application (SPA):
Edit the routes/web.php file and make the following changes:
Route::get('/get_users', 'UserController@getUsers');
Route::get('/users', 'UserController@index')->name('users');
This will direct all /users traffic to the UserController@index method which will render the view that in turn loads the React SPA. We also add a pseudo api call, /get_users, to the route, which we’ll utilize to return data to the React components later on.
Navigation menu element
Let’s also add a navigation item to the left-hand navigation bar. Edit the resources/views/components/left_nav.blade.php file and make the following changes:
<a href="/users" class="list-group-item list-group-item-action bg-light"><i class="fas fa-users mr-2"></i>Users</a>
This will ensure users can find and browse to our new React SPA.
Create the UserController object
Next we need to create the controller that will render the view containing the React SPA. From the command line:
php artisan make:controller UserController --model=User
Once that’s finished edit the new controller file app/Http/Controllers/UserController.php, and modify its contents to the following:
<?php

namespace App\Http\Controllers;

use App\User;
use Illuminate\Http\Request;

class UserController extends Controller
{
	/**
	* Display a listing of the resource.
	*
	* @return \Illuminate\Http\Response
	*/
	public function index()
	{
		return view('users');
	}

	/**
	* Show the form for creating a new resource.
	*
	* @return \Illuminate\Http\Response
	*/
	public function create()
	{
		//
	}

	/**
	* Store a newly created resource in storage.
	*
	* @param  \Illuminate\Http\Request  $request
	* @return \Illuminate\Http\Response
	*/
	public function store(Request $request)
	{
		//
	}

	/**
	* Display the specified resource.
	*
	* @param  \App\User  $user
	* @return \Illuminate\Http\Response
	*/
	public function show(User $user)
	{
		//
	}

	/**
	* Show the form for editing the specified resource.
	*
	* @param  \App\User  $user
	* @return \Illuminate\Http\Response
	*/
	public function edit(User $user)
	{
		//
	}

	/**
	* Update the specified resource in storage.
	*
	* @param  \Illuminate\Http\Request  $request
	* @param  \App\User  $user
	* @return \Illuminate\Http\Response
	*/
	public function update(Request $request, User $user)
	{
		//
	}

	/**
	* Remove the specified resource from storage.
	*
	* @param  \App\User  $user
	* @return \Illuminate\Http\Response
	*/
	public function destroy(User $user)
	{
		//
	}

	/**
	* Fetch and return a JSON array of Users
	*
	* @param  \App\User  $user
	* @return \Illuminate\Http\JsonResponse
	*/
	public function getUsers()
	{
		// Use 'with' option to enable eager loading for the user roles
		$users = User::with('roles')->get();

		// Uncomment line below to simulate no data returned
		//$users = array();

		// We have a sleep here so we can observe the loading overlay in the view
		sleep(1);

		// Return JSON response
		return response()->json(['data' => $users]);
	}

}
This controller is responsible for not only returning the view that renders the React SPA, but also for gathering and formatting the data required by the view.
Most of this code in this controller is boilerplate, but don’t worry we’ll add more to it as we go. The the two changes we did make to the boilerplate code are:
The index() method
	public function index()
	{
		return view('users');
	}
This method simply returns the resources/views/users.blade.php review which in turn loads the React SPA.
The getUsers() method
public function getUsers()
{
	// Use 'with' option to enable eager loading for the user roles
	$users = User::with('roles')->get();

	// Uncomment line below to simulate no data returned
	//$users = array();

	// We have a sleep here so we can observe the loading overlay in the view
	sleep(1);

	// Return JSON response
	return response()->json(['data' => $users]);
}
This method pulls a list of all users from the database, pauses for one second to simulate a data fetching delay, and then returns the results as JSON.
Assuming your are running this locally you can browse to http://localhost:8080/get_users to see an example of what the method would return:
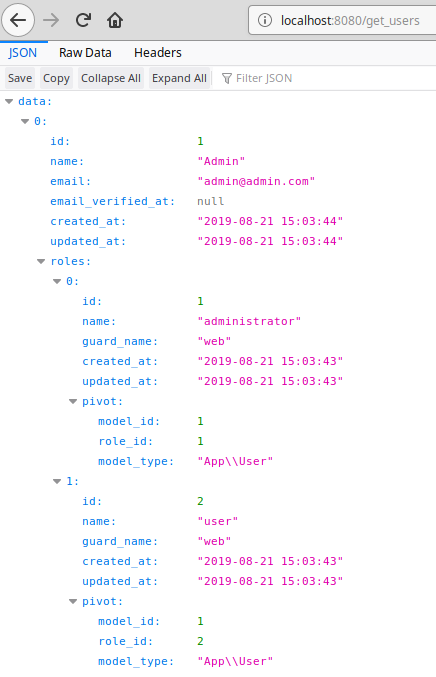
Create the Laravel view
Next we need to create the Laravel blade file that will be shown to the user when they browse to the /users URL. Edit the resources/views/users.blade.php file and add the following:
@extends('layouts.app')

@section('content')
		<!-- React User manager  -->
		<div class="container-fluid">
				<div class="mt-5" id="users" />
		</div>
@endsection

@section('js_after')
	<script type="text/javascript">
		$(document).ready(function() {
				//
		} );
	</script>
@endsection
As can be seen the only job of this file is to provide a named DIV element for the React application to attach to and then load in on. We also provided a placeholder for any custom javascript we want executed when the page loads.
Add React SPA to Laravel mix
The last thing we need to do on the Laravel side of things is to include the React SPA into our Laravel mix directives. Edit the resources/js/app.js file and add the following:
require('./components/Users');
This will ensure our SPA code and assets are included in the compiled js/app.js file.
That should be the end of our Laravel tasks, and from here on out the rest of our work will be creating the React javascript assets.
Develop React assets
Install npm packages
First we’ll want to install the npm packages we’ll need later on:
npm install react-bootstrap-table-next --save
npm install react-bootstrap-table2-toolkit --save
npm install react-bootstrap-table2-paginator --save
npm install react-bootstrap-table2-overlay --save

npm run dev
Clearly we are going to be doing some work later on with the React bootstrap table package. You can learn more about it and its features via the following links:
Main features:
- Github: https://github.com/react-bootstrap-table/react-bootstrap-table2
- Main documentation: https://react-bootstrap-table.github.io/react-bootstrap-table2/docs/getting-started.html
- Storybook: https://react-bootstrap-table.github.io/react-bootstrap-table2/storybook/
Components:
- Export to CSV, search, and column toggle: https://react-bootstrap-table.github.io/react-bootstrap-table2/docs/toolkits-getting-started.html
- Pagination: https://react-bootstrap-table.github.io/react-bootstrap-table2/docs/basic-pagination.html
- Loading overlay: https://react-bootstrap-table.github.io/react-bootstrap-table2/docs/migration.html
The SPA ‘skeleton’
Next we want to create the initial SPA application component that will load and display all the other React assets. We’ll call this the SPA’s ‘skeleton’ since everything else depends on it and the structure it provides. The skeleton will start by creating the base HTML of the dashboard that the other React components will render into.
Create and then add following content to the ‘resources/js/components/Users.js’ file:
import React, { Component } from 'react';
import ReactDOM from 'react-dom';

import Index from './Index.js'

export default class Users extends Component {
	render() {
		return (
			<div>
				<div className="row justify-content-center">
					<div className="col-12">
						{/* Load the Index component */}
						<Index />
					</div>
				</div>
			</div>
		);
	}
}

if (document.getElementById('users')) {
	ReactDOM.render(<Users />, document.getElementById('users'));
}
This file is fairly simple and straightforwards. It performs the following tasks:
- Imports the Index component which will display the list of Users and provide access to the CRUD functions
- Builds the HTML structure the SPA resides in
- Attaches to the user DIV element and instantiates the SPA
Index component
The Index component is responsible for loading and displaying the list of application users as well as providing links to the create, edit, and delete functions.
Create the resources/js/components/Index.js file and add the following code to it:
// Standard import items
import React, { Component } from 'react';
import ReactDOM from 'react-dom';
import axios from 'axios';

// Our custom components
import TableExportAndSearch from './TableExportAndSearch';

// React BootstrapTable import items
import 'react-bootstrap-table-next/dist/react-bootstrap-table2.min.css';
import 'react-bootstrap-table2-paginator/dist/react-bootstrap-table2-paginator.min.css';
import 'react-bootstrap-table2-toolkit/dist/react-bootstrap-table2-toolkit.min.css';

import BootstrapTable from 'react-bootstrap-table-next';
import paginationFactory from 'react-bootstrap-table2-paginator';
import ToolkitProvider from 'react-bootstrap-table2-toolkit';
import overlayFactory from 'react-bootstrap-table2-overlay';


export default class Index extends Component {

	// Class constructor
	constructor(props) {

		super(props);

		this.state = {
			// Container for data fetched from the backend
			userData: [],
			// Track if we have an outstanding call to the backend in progress
			loading: false,
		};

		//Bindings
		this.fetchUserData = this.fetchUserData.bind(this);
	}

	// Actions to take once the component loads
	componentDidMount() {
		this.fetchUserData();
	}

	// Fetch list of users from backend and assign to state data property
	fetchUserData() {

		// Indicate component is fetching data
		this.setState({
			loading: true,
		});

		// Make ajax call to backend to fetch user data
		axios.get('/get_users')
		.then( (response) => {
			// If data was returned assign to state userData variable
			// otherwise assign an empty array to the userData variable
			if (response.data) {
				this.setState({
					userData: response.data.data
				});
			} else {
				// No data was returned from the ajax call
				this.setState({
					userData: []
				});
			}
		})
		.catch(function (error) {
			// Log any errors
			console.log(error);
		})
		.then( () => {
			// Indicate component is finished fetching data
			this.setState({
				loading: false,
			});
		});
	}
	// END fetchUserData()

	// Show/hide the create new user modal
	toggleCreateModal() {
		//
	}

	// Wrap the user's role(s) in a bootstrap badge element
	// Called by the user data table below
	roleTableFormatter(cell, row) {
		return (
			<span>
			{ cell.map( (val, index) => {
				return <span key={index} className="badge badge-primary mr-2">{ val.name }</span>
			})}
			</span>
		)
	}

	// Extract the user's role(s) into a comma delimited string
	// Called by the user data table below
	roleCSVFormatter(cell, row, rowIndex) {
		let roles = cell.map( (val, index) => {
			return val.name;
		});

		// Note the backticks below... template literals
		// Ref:  https://developer.mozilla.org/en-US/docs/Web/JavaScript/Reference/Template_literals
		return `${roles.join(",")}`;
	}


	// Examine this.props and this.state and return class response (typical React elements)
	render() {

		// Configure what should be shown if no data is returned from the ajax calll
		// Ref https://react-bootstrap-table.github.io/react-bootstrap-table2/docs/overlay.html
		const NoDataIndication = () => (
			<span className="font-italic">No data found....</span>
		);

		// Define data table columns and which data fields the values should come from
		const columns = [
			{
				dataField: 'id',
				text: 'User ID',
				sort:true,
			}, {
				dataField: 'name',
				text: 'Name',
				sort:true,
			}, {
				dataField: 'email',
				text: 'Email',
				sort:true,
			}, {
				dataField: 'roles',
				text: 'Roles',
				sort:true,
				formatter: this.roleTableFormatter,
				csvFormatter: this.roleCSVFormatter,
			},

		];

		// Prepare and return React elements
		return(
			<div>
				{/* Card div */}
				<div className="card">
					<div className="card-header">User Index</div>

					{/* Card body div */}
					<div className="card-body">
						{/*
							Provide export and search features via the ToolkitProvider
							Ref:  https://react-bootstrap-table.github.io/react-bootstrap-table2/docs/toolkits-getting-started.html
						*/}
							<ToolkitProvider
								bootstrap4={ true }
								keyField="id"
								data={ this.state.userData }
								columns={ columns }
								search
								exportCSV
							>
							{
								props => (
									<div>
										{/* Show/hide create user modal */}
										<div>
											<button type="button" className="btn btn-outline-success" onClick={this.toggleCreateModal}>
											<i className="fa fa-fw fa-plus"></i> Create User
											</button>
										</div>
										{/* END Show/hide create user modal */}

										{/* Render CSV export and search components for data table */}
										<TableExportAndSearch csvProps={ props.csvProps } searchProps= { props.searchProps } />
										{/* END Render CSV export and search components for data table */}

										{/* Create the user data table */}
										<BootstrapTable
											{ ...props.baseProps }
											loading={ this.state.loading }
											pagination={ paginationFactory() }
											striped={ true }
											bordered={ true }
											hover={ true }
											rowClasses="font-size-sm"
											noDataIndication={ () => <NoDataIndication /> }
											overlay={ overlayFactory({ spinner: true, background: 'rgba(220,220,220,0.3)', text: 'Loading....' }) }
										/>
										{/* END Create the user data table */}
									</div>
								)
							}
							</ToolkitProvider>
							{/* END ToolkitProvider */}

						</div>
						{/* END Card body div */}

					</div>
					{/* END Card div */}

				</div>
		);
	}
	// END render

}

}
Next let’s review some of the key functions of this file.
The fetchUserData() method
// Fetch list of users from backend and assign to state data property
	fetchUserData() {

		// Indicate component is fetching data
		this.setState({
			loading: true,
		});

		// Make ajax call to backend to fetch user data
		axios.get('/get_users')
		.then( (response) => {
			// If data was returned assign to state userData variable
			// otherwise assign an empty array to the userData variable
			if (response.data) {
				this.setState({
					userData: response.data.data
				});
			} else {
				// No data was returned from the ajax call
				this.setState({
					userData: []
				});
			}
		})
		.catch(function (error) {
			// Log any errors
			console.log(error);
		})
		.then( () => {
			// Indicate component is finished fetching data
			this.setState({
				loading: false,
			});
		});
	}
	// END fetchUserData()
This function first sets the loading flag to true, which in turn renders a loading overlay onto the page. This let’s the user know something is going on in the background. Next a GET request is made via axios to the Laravel back end to obtain a list of users. If this completes successfully the userData variable is populated with the results. And lastly, the loading flag is set to false which removes the loading overlay and lets the user know that fetching the data is complete.
The roleTableFormatter() method
roleTableFormatter(cell, row) {
	return (
		<span>
		{ cell.map( (val, index) => {
			return <span key={index} className="badge badge-primary mr-2">{ val.name }</span>
		})}
		</span>
	)
}
	// END fetchUserData()
As we saw earlier the user roles are contained in a nested JSON attribute in the data returned from the back end. This method not only extracts the roles, but it also wraps them into a badge element visual component.
![]()
The roleCSVFormatter() method
roleCSVFormatter(cell, row, rowIndex) {
	let roles = cell.map( (val, index) => {
		return val.name;
	});

	// Note the backticks below... template literals
	// Ref:  https://developer.mozilla.org/en-US/docs/Web/JavaScript/Reference/Template_literals
	return `${roles.join(",")}`;
}
As saw earlier the user roles are contained in a nested JSON attribute in the data returned from the back end. This method collects the user roles into a comma delimited string for use when exporting the data to CSV.
The render() method
There is a lot going on in this method, so we’ll examine the components individually:
No data
const NoDataIndication = () => (
	<span className="font-italic">No data found....</span>
);
// END fetchUserData()
This code configures what the datatable should show when no data is for the table is avaiable.
Table columns
const columns = [
	{
		dataField: 'id',
		text: 'User ID',
		sort:true,
	}, {
		dataField: 'name',
		text: 'Name',
		sort:true,
	}, {
		dataField: 'email',
		text: 'Email',
		sort:true,
	}, {
		dataField: 'roles',
		text: 'Roles',
		sort:true,
		formatter: this.roleTableFormatter,
		csvFormatter: this.roleCSVFormatter,
	},
];
This code defines which columns should appear in the datatable, the column heading title, if the column is sortable, and how to format the HTML and CSV outputs for the column in the case of the roles elelment.
Return the final React elements
// Prepare and return React elements
		return(
			....
			....
			....
		)
// END render
The code in this section may look complicated, but it’s actually rather straightforwards:
- First we define the HTML container for the React components
<div>
	{/* Card div */}
	<div className="card">
		<div className="card-header">User Index</div>

		{/* Card body div */}
		<div className="card-body">
// END fetchUserData()
- Next we call the
ToolkitProvidercomponent which provides CSV exports and searching:
<ToolkitProvider
	bootstrap4={ true }
	keyField="id"
	data={ this.state.userData }
	columns={ columns }
	search
	exportCSV
>
// END fetchUserData()
- We then pass a custom create user button, the table export and search components, and the actual bootstrap table itself to the
ToolkitProvider’s props:
{
props => (
	<div>
		{/* Show/hide create user modal */}
		<div>
			<button type="button" className="btn btn-outline-success" onClick={this.toggleCreateModal}>
			<i className="fa fa-fw fa-plus"></i> Create User
			</button>
		</div>
		{/* END Show/hide create user modal */}

		{/* Render CSV export and search components for data table */}
		<TableExportAndSearch csvProps={ props.csvProps } searchProps= { props.searchProps } />
		{/* END Render CSV export and search components for data table */}

		{/* Create the user data table */}
		<BootstrapTable
			{ ...props.baseProps }
			loading={ this.state.loading }
			pagination={ paginationFactory() }
			striped={ true }
			bordered={ true }
			hover={ true }
			rowClasses="font-size-sm"
			noDataIndication={ () => <NoDataIndication /> }
			overlay={ overlayFactory({ spinner: true, background: 'rgba(220,220,220,0.3)', text: 'Loading....' }) }
		/>
		{/* END Create the user data table */}
	</div>
)
}
Whew! And after all that we have one more component to write.
Table export and search component
The TableExportAndSearch component is responsible drawing the CSV export button and search field to the datatable.
Create the resources/js/components/TableExportAndSearch.js file and add the following code to it:
import React, {Component} from 'react';
import { Search, CSVExport } from 'react-bootstrap-table2-toolkit';

export default class TableExportAndSearch extends Component {
	render() {

		const { SearchBar } = Search;
		const { ExportCSVButton } = CSVExport;

		return (
			<div className="row text-right mb-1">
				{/* col-md-6 offset-md-9 */}
				<div className="col-md-6 offset-md-9">
					{/* inner row */}
					<div className="row mt-2">

						{/* Render CSV export button */}
						<div className="mr-5">
							<ExportCSVButton
								{	 ...this.props.csvProps}
								className="btn btn-primary form-control btn-sm"
							>
								CSV
							</ExportCSVButton>
						</div>
						{/* END Render CSV export button */}

						{/* Render table search field */}
						<div className="col-xs-3">
							<SearchBar
								{ ...this.props.searchProps }
								placeholder="Search...."
							/>
						</div>
						{/* END table search field */}

					</div>
					{/* END inner row */}
				</div>
				{/* END col-md-6 offset-md-9 */}
			</div>
		);
	}
}
This file simply creates an HTML structure to contain the React bootstrap table’s CSV export button and search field, and then places the ExportCSVButton and SearchBar components respectively into the structure.
The end result
To wrap up we first want to compile the code we wrote above using the following terminal command:
npm run dev
Once that’s finished browse to your Laravel application, click the Users link in the navigation bar, and you should see the following:
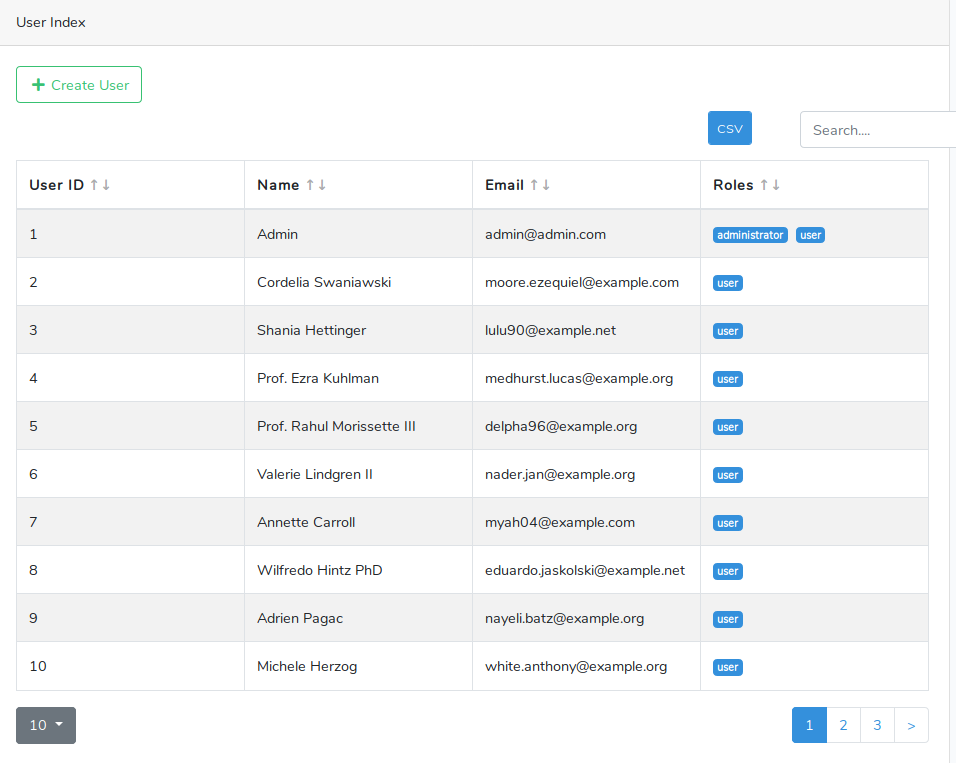
Summary
This post has covered the first step in creating a User management SPA utilizing Laravel and React. In the next part of the series we’ll explore adding the capability to create new user accounts, and have them saved to the database.
You can find the source code for this post here.
If you have any comments or questions please don’t hesitate to reach out.
Thanks!


Comments