In this third post of the series we add the ability to edit existing users to our CRUD based user management single page application (SPA) utilizing Laravel and React.
Series posts
Posts in this series:
- Part one - Initial setup with user accounts data table
- Part two - Adding the ability to create new users
- Part three - Adding the ability to edit existing users
- Part four - Adding the ability to delete existing users
With more to follow…
Prerequisites and assumptions
For this discussion I assume you’ve followed the instructions in the second post, and we continue by building on what we did previously.
You can also find the source code for this post here.
Create Laravel assets
To start we’ll create the Laravel assets needed to support the React components.
Routing
First we’ll add the new routes for the React single page application (SPA) dealing with user modification.
Edit the routes/web.php file and add the following code:
<?php

// Default route
Route::get('/', function () {
    return redirect( route('home'));
});

Auth::routes();

Route::get('/home', 'HomeController@index')->name('home');

Route::get('/get_users', 'UserController@getUsers');
Route::post('/create_user', 'UserController@store');
Route::put('/edit_user/{id}', 'UserController@update');
Route::get('/users', 'UserController@index')->name('users');
We added a new route, /edit_user/{id}, which accepts a PUT request containing the ID of the user account we wish to edit. This route will handle the actions that need to take place when the edit user form is submitted via React to the Laravel back end.
We chose to add this new route as a PUT request, because we’d like to follow Laravel’s resource controller action standards (reference).
app/Http/Controllers/UserController.php
Let’s update the user controller next. Edit the app/Http/Controllers/UserController.php file and add the following class method:
/**
* Update the specified resource in storage.
*
* @param App\Http\Requests\UserFormRequest $request
* @param  integer  $id
* @return \Illuminate\Http\JsonResponse
*/
public function update(UserFormRequest $request, $id)
//public function update(Request $request, $id)
{
	// Pull the user record from the database
	$user = User::findOrFail($id);

	// Check to see if we're updating the user's password
	if ($request->has('password')) {
		$user->fill($request->all());
	}
	// If the password field is blank skip it; we aren't
	// replacing it with a new one
	else {
			$user->fill($request->except(['password', 'password_confirmation']));
	}

	// Save the user record to the database
	$user->save();

	// Update the user's roles and permissions
	$roles = $request->input('roles') ? $request->input('roles') : [];
	$user->syncRoles($roles);

	// Create response to be returned to the view
	$response['result']['type'] = 'success';
	$response['result']['message'] = 'The user was successfully updated!';
	$response['data'] = $user->__toString();

	// Return JSON response
	return response()->json($response);
}
This method first utilizes the UserFormRequest Laravel form request object we authored last post to handle input form validation. (For reference you can view the source code here.)
Note that if validation fails then Laravel will take care of returning a 422 status response along with whatever validation rules failed to the view.
Next the method attempts to pull the user record being modified from the database with a findOrFail() method call. Assuming that completes successfully we then check to see if the user being modified has a new password being set. If not we need to skip the password field, because otherwise SQL will throw a blank value error when we update.
The user record’s values are then updated with the contents of the form input values, saved, and any role changes are applied. And finally we return a JSON result to the view including the updated user object.
app/User.php
Next let’s review the two minor changes we made to the app/User.php class:
// ==> FIRST CHANGE @ LINE 9
use Illuminate\Support\Facades\Hash;


// ==> SECOND CHANGE @ LINE 42
/**
 * Hash the user's password
 * https://laravel.com/docs/5.8/eloquent-mutators#defining-a-mutator
 *
 * @param $value
 */
public function setPasswordAttribute($value)
{
		if ($value) {
				$this->attributes['password'] =
					app('hash')->needsRehash($value) ? Hash::make($value) : $value;
		}
}
We need to implement the setPasswordAttribute() mutator method to rehash the user’s password if it was updated in the edit user form. Otherwise it will be stored as plain text in the database, and the user won’t be able to log into the application.
That should be the end of our Laravel tasks, and from here on out the rest of our work will be creating the React javascript assets.
Develop React assets
resources/js/components/Index.js
Since we did most of the heavy lifting last post the changes to the resources/js/components/Index.js file are relatively minor:
// ==> ADD THE EDIT USER MODAL CODE BLOCK @ LINE 278

{/* Edit user form modal */}
<div>
	<FormModal
		isOpen={ this.state.modalsOpen['edit'] }
		onRequestClose={ (e) => this.toggleModal('edit', this.state.user) }
		contentLabel="Edit User"
		title="Edit User"
		modalAppElement="#users"
		styleOverride={ new Object({width: '40%', left: '35%',}) }
	>
		{/* Define and render the actual edit user form  */}
		<EditForm
			onClose={ (e) => this.toggleModal('edit', this.state.user) }
			onUpdate={ this.fetchUserData }
			user={ this.state.user }
		/>
	</FormModal>
</div>
{/* END Edit user form modal */}
This code is almost exactly the same as the Create user form modal code block just above it in the source.
The only differences are the 1) update to the label and title, and 2) we are now passing this.state.user as the second argument to the this.toggleModal method. As we’ll see in a moment this allows the edit user form to display the current values for the target user in its Formik form fields.
resources/js/components/EditForm.js
Lastly we have the new resources/js/components/EditForm.js file. As is the case oftentimes when developing a CRUD application the create and edit functionality share much of the same code. Let’s execute the following terminal command which will highlight this:
diff resources/js/components/CreateForm.js resources/js/components/EditForm.js
And the output:
15c15
< export default class CreateForm extends Component {
---
> export default class EditForm extends Component {
79,80c79,80
<	name: '',
<	email: '',
---
>	name: this.props.user.name,
>	email: this.props.user.email,
83c83,85
<	roles: [1],
---
>	roles: this.props.user.roles.map( (value, key) => {
>		return value.id;
>	}),
93,94c95,96
<	axios.post(
<		'/create_user',
---
>	axios.put(
>		'/edit_user/' + this.props.user.id,
104,108d105
<
<			// Reset the form if the user was created successfully
<			if (response.data.result.type == 'success') {
<				actions.resetForm(this.props.initialValues);
<			}
198c195
<				<label htmlFor="password">Password
				<span className="text-danger">*</span></label>
---
>				<label htmlFor="password">Password</label>
203c200
<					placeholder="User's Password..."
---
>					placeholder="New Password..."
209c206
<				<label htmlFor="password_confirmation">Confirm Password
				<span className="text-danger">*</span></label>
---
>				<label htmlFor="password_confirmation">Confirm Password</label>
214c211
<					placeholder="Confirm Password..."
---
>					placeholder="Confirm New Password..."
253c250
<				<i className="fa fa-fw fa-plus mr-1"></i> Create User
---
>				<i className="fa fa-fw fa-plus mr-1"></i> Edit User
So these files are almost exactly the same, which is a good indication we can perform some refactoring and DRY up our code in the future. However, before we do that let’s wrap this post up, create the delete user functionality, and ensure we’ve seen all the usability patterns our code will support.
Making the code DRY is a good thing, but we don’t want to refactor in a way that will prevent us from including must-have functionality in other code segments. Sometimes it is perfectly acceptable to repeat yourself a few times until you see the whole pattern. Once that occurs you can then refactor knowing that all the edge cases are accounted for in an sane, maintainable way.
The end result
To wrap up we first want to compile the code we wrote above using the following terminal command:
npm run dev
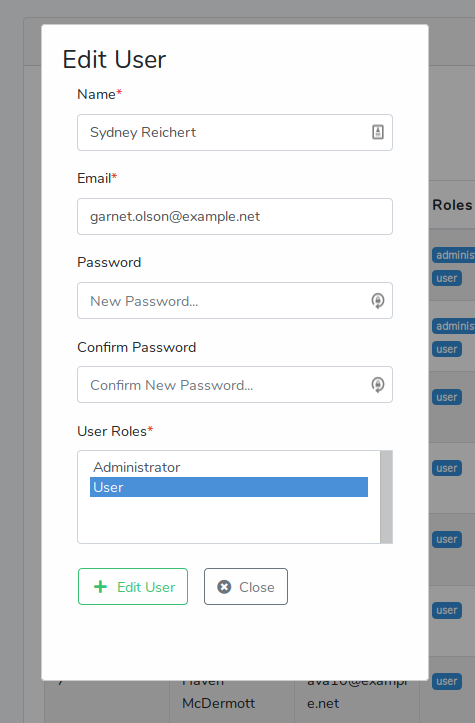
Once that’s finished browse to your Laravel application, click the Users link in the navigation bar, and then click the pencil icon in one of the user rows. You should then see the following:

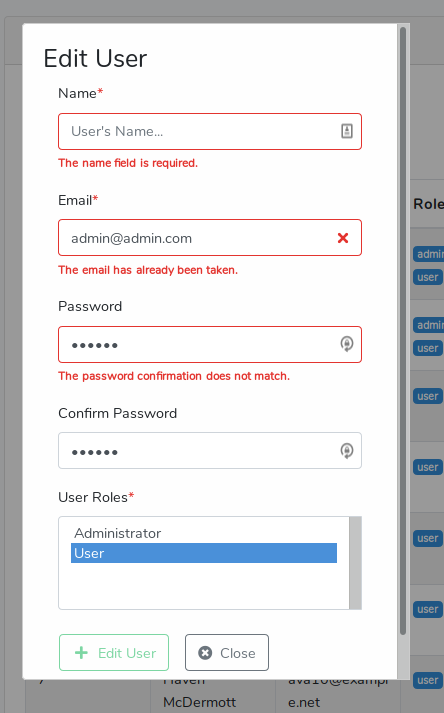
And with form validation:

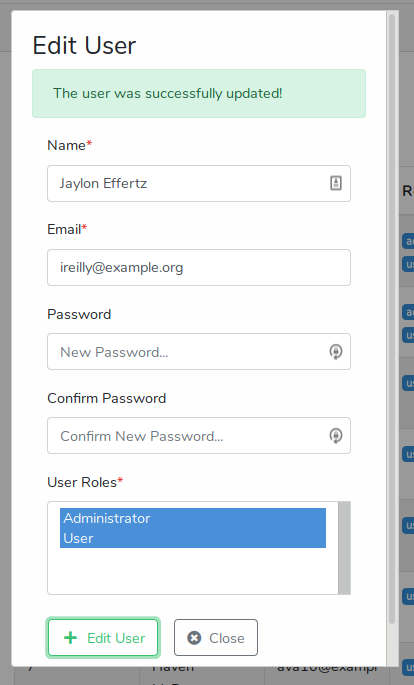
And finally a success response:

Summary
This post has covered the third step in creating a User management SPA utilizing Laravel and React. In the next part of the series we’ll explore adding the capability to delete an existing user.
You can find the source code for this post here.
If you have any comments or questions please don’t hesitate to reach out.
Thanks!


Comments