In this post we continue work on our Application Template by applying a minimalist bootstrap theme to the user interface. We also explore the feasibility of adding additional assets to the template such as Font Awesome and DataTables.
You can find the complete source code for this post on GitHub.
You can also find the first post in this series here.
Why such a sparse theme?
There are a large number of very detailed, feature filled Bootstrap and Material Design templates available on the internet. However, in this instance we’ve gone with a much more stripped down version. We want the end result of our efforts to be an application template we can use to kick-start new projects quickly, use for interview homework exercises, etc. We don’t want to spend hours unhooking and removing all sorts of fancy libraries and styling we might not need out of the code base.
It will be much easier to add new styling, libraries, single page applications, etc. to a “blank slate” then try to incorporate new functionality into a complicated web of dependencies and auto loading scripts.
Obtain the bootstrap template
We’ll be utilizing the following open source template in our application template: https://github.com/BlackrockDigital/startbootstrap-simple-sidebar
Apply the template
Modify resources/sass/app.scss
To start append the contents of the startbootstrap-simple-sidebar-gh-pages/css/simple-sidebar.css file to the resources/sass/app.scss file. The final result should look like this:
// Fonts
@import url('https://fonts.googleapis.com/css?family=Nunito');

// Variables
@import 'variables';

// Bootstrap
@import '~bootstrap/scss/bootstrap';

/*!
 * Start Bootstrap - Simple Sidebar (https://startbootstrap.com/template-overviews/simple-sidebar)
 * Copyright 2013-2019 Start Bootstrap
 * Licensed under MIT (https://github.com/BlackrockDigital/startbootstrap-simple-sidebar/blob/master/LICENSE)
 */
body {
  overflow-x: hidden;
}

#sidebar-wrapper {
  min-height: 100vh;
  margin-left: -15rem;
  -webkit-transition: margin .25s ease-out;
  -moz-transition: margin .25s ease-out;
  -o-transition: margin .25s ease-out;
  transition: margin .25s ease-out;
}

#sidebar-wrapper .sidebar-heading {
  padding: 0.875rem 1.25rem;
  font-size: 1.2rem;
}

#sidebar-wrapper .list-group {
  width: 15rem;
}

#page-content-wrapper {
  min-width: 100vw;
}

#wrapper.toggled #sidebar-wrapper {
  margin-left: 0;
}

@media (min-width: 768px) {
  #sidebar-wrapper {
    margin-left: 0;
  }

  #page-content-wrapper {
    min-width: 0;
    width: 100%;
  }

  #wrapper.toggled #sidebar-wrapper {
    margin-left: -15rem;
  }
}
This adds the CSS elements we need for the theme to our master style sheet.
Modify resources/views/layouts/app.blade.php
Next we are going to replace the contents of the resources/views/layouts/app.blade.php file with the following:
<!DOCTYPE html>
<html lang="{{ str_replace('_', '-', app()->getLocale()) }}">
<head>
  <meta charset="utf-8">
  <meta name="viewport" content="width=device-width, initial-scale=1">

  <!-- CSRF Token -->
  <meta name="csrf-token" content="{{ csrf_token() }}">

  <title>{{ config('app.name', 'Laravel') }}</title>

  <!-- Fonts -->
  <link rel="dns-prefetch" href="//fonts.gstatic.com">
  <link href="https://fonts.googleapis.com/css?family=Nunito" rel="stylesheet">

  <!-- Styles -->
  @yield('css_before')
  <link href="{{ asset('css/app.css') }}" rel="stylesheet">
  @yield('css_after')

  <!-- Scripts -->
  <script>window.Laravel = {!! json_encode(['csrfToken' => csrf_token(),]) !!};</script>

</head>
<body>
  <div id="app">

    <div class="d-flex" id="wrapper">

      <!-- Sidebar -->
      @include('components.left_nav')
      <!-- END Sidebar -->

      <!-- Page Content -->
      <div id="page-content-wrapper">

        <!-- Top Nav -->
        @include('components.top_nav')
        <!-- END Top Nav -->

        <div class="container-fluid">
          <main class="mt-4">

            @yield('content')

            <!-- React example binding  -->
            <div class="mt-5" id="example" />
            <!-- END React example binding  -->

          </main>
        </div>
        <!-- END <div class="container-fluid"> -->

      </div>
      <!-- /#page-content-wrapper -->

    </div>
    <!-- /#wrapper -->

  </div>
  <!-- END <div id="app"> -->

  <!-- Scripts -->
  <!-- Move this here and remove 'defered', or you'll have a jQuery not defined error!
  See https://stackoverflow.com/questions/51595843/laravel-5-webpack-jquery-is-not-defined -->
  <script src="{{ mix('js/app.js') }}"></script>

  <script type="text/javascript">
    $("#menu-toggle").click(function(e) {
      e.preventDefault();
      $("#wrapper").toggleClass("toggled");
    });
  </script>

  @yield('js_after')

</body>
</html>
This isn’t much different from the out-of-the-box layout template that comes by default with a new Laravel implementation. Changes of note include:
- We @included the left and top-nav bars (which we’ll be creating next)
- We added @yield statements for CSS and Javascript assets
- We moved the mix(‘js/app.js’) script statement to the end of the body and removed the defered statement to prevent jQuery not found errors from occurring
And, because our template is using basic bootstrap components and features, we don’t need to make any changes to our app.js file which is a bonus.
Create the Left and Top navigation elements:
To start execute the following commands from the terminal:
$ mkdir resources/views/components
$ touch resources/views/components/left_nav.blade.php
$ touch resources/views/components/top_nav.blade.php
Next, edit the resources/views/components/left_nav.blade.php file, and enter in the following code:
<div class="bg-light border-right" id="sidebar-wrapper">
  <div class="sidebar-heading">Start Bootstrap </div>
  <div class="list-group list-group-flush">
    <a href="#" class="list-group-item list-group-item-action bg-light">Dashboard</a>
    <a href="#" class="list-group-item list-group-item-action bg-light">Shortcuts</a>
    <a href="#" class="list-group-item list-group-item-action bg-light">Overview</a>
    <a href="#" class="list-group-item list-group-item-action bg-light">Events</a>
    <a href="#" class="list-group-item list-group-item-action bg-light">Profile</a>
    <a href="#" class="list-group-item list-group-item-action bg-light">Status</a>
  </div>
</div>
This creates the placeholder left-nav menu items.
Now edit the resources/views/components/top_nav.blade.php file and enter in the following code:
<nav class="navbar navbar-expand-lg navbar-light bg-light border-bottom">
  <button class="btn btn-primary" id="menu-toggle">Toggle Menu</button>

  <button class="navbar-toggler" type="button" data-toggle="collapse" data-target="#navbarSupportedContent" aria-controls="navbarSupportedContent" aria-expanded="false" aria-label="Toggle navigation">
    <span class="navbar-toggler-icon"></span>
  </button>

  <div class="collapse navbar-collapse" id="navbarSupportedContent">
    <ul class="navbar-nav ml-auto mt-2 mt-lg-0">
      <li class="nav-item active">
        <a class="nav-link" href="#">Home <span class="sr-only">(current)</span></a>
      </li>
      <li class="nav-item">
        <a class="nav-link" href="#">Link</a>
      </li>
      <li class="nav-item dropdown">
        <a class="nav-link dropdown-toggle" href="#" id="navbarDropdown" role="button" data-toggle="dropdown" aria-haspopup="true" aria-expanded="false">
          Dropdown
        </a>
        <div class="dropdown-menu dropdown-menu-right" aria-labelledby="navbarDropdown">
          <a class="dropdown-item" href="#">Action</a>
          <a class="dropdown-item" href="#">Another action</a>
          <div class="dropdown-divider"></div>
          <a class="dropdown-item" href="#">Something else here</a>
        </div>
      </li>
    </ul>
  </div>
</nav>
This places the top-nav bar on the page, and you can customize as you see fit.
Test
Let’s test everything out by executing the following command:
$ composer dump-autoload && php artisan cache:clear && php artisan serve
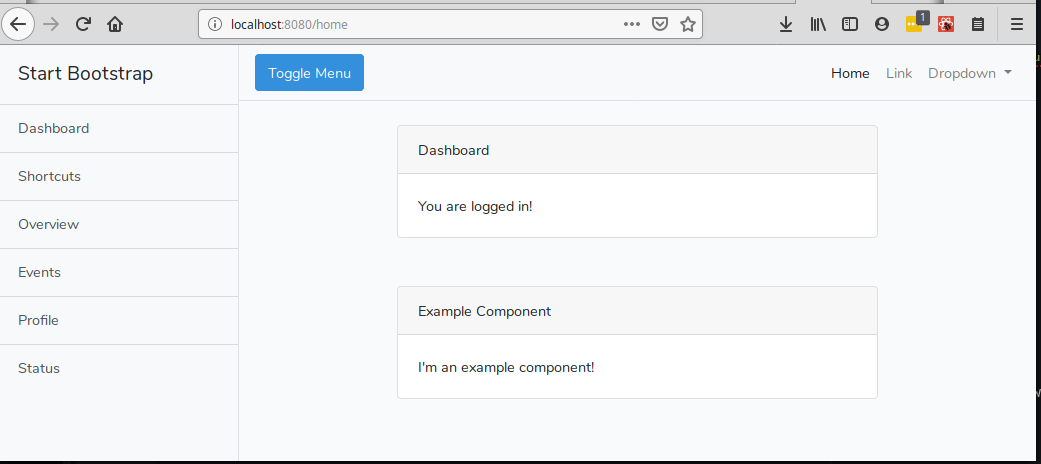
Once you browse to http://localhost:8000/home you should see the following:

We can observe that the HTML, CSS, Javascript, and React components all loaded and are working correctly.
Adding additional assets
Just for fun let’s add some additional assets to get a feel for how easy it is (or isn’t as the case may be…).
Adding Font Awesome to the template
The main Front Awesome web site is located here.
To add Font Awesome to the template we can complete the following steps:
- Download the Font Awesome SCSS files which are available here
- Extract the downloaded SCSS assets
- Execute the following commands in the terminal:
$ mkdir <PATH_TO_APP>/resources/sass/fontawesome $ cp <PATH_TO_EXTRACTS>/fontawesome-free-5.10.0-web/scss/* <PATH_TO_APP>/resources/sass/fontawesome $ mkdir -p <PATH_TO_APP>/public/fonts/fontawesome $ cp <PATH_TO_EXTRACTS>/fontawesome-free-5.10.0-web/webfonts/* <PATH_TO_APP>/public/fonts/fontawesome - Open the resources/sass/_variables.scss file and add the following line to the end of the file:
$fa-font-path: "/fonts/fontawesome"; - Open the resources/sass/app.scss file and add the following lines just under the // Bootstrap entries:
// Font Awesome @import 'fontawesome/fontawesome.scss'; @import 'fontawesome/regular.scss'; @import 'fontawesome/solid.scss'; @import 'fontawesome/brands.scss'; - To test everything let’s add some icons to the UI. Edit the resources/views/components/left_nav.blade.php file, and replace the conents with the following:
<div class="bg-light border-right" id="sidebar-wrapper">
  <div class="sidebar-heading">Start Bootstrap </div>
  <div class="list-group list-group-flush">
    <a href="#" class="list-group-item list-group-item-action bg-light"><i class="fab fa-elementor mr-2"></i>Dashboard</a>
    <a href="#" class="list-group-item list-group-item-action bg-light"><i class="fas fa-external-link-alt mr-2"></i>Shortcuts</a>
    <a href="#" class="list-group-item list-group-item-action bg-light"><i class="fas fa-file-import mr-2"></i>Overview</a>
    <a href="#" class="list-group-item list-group-item-action bg-light"><i class="far fa-calendar-check mr-2"></i>Events</a>
    <a href="#" class="list-group-item list-group-item-action bg-light"><i class="fas fa-user mr-2"></i>Profile</a>
    <a href="#" class="list-group-item list-group-item-action bg-light"><i class="fas fa-info-circle mr-2"></i>Status</a>
  </div>
</div>
- Terminate the artisan serve process, and execute the following commands in the terminal:
$ npm run dev
$ composer dump-autoload && php artisan cache:clear && php artisan serve
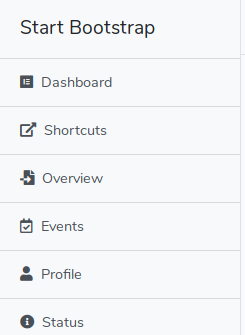
Once you browse to http://localhost:8000/home you should see the following in the left nav bar:

We can observe that the Font Awesome assets were correctly added to the application template, and that they are displaying in the UI.
Adding DataTables to the template
The main DataTables web site is located here. I’ve found the best way to select and install the proper components is as follows:
- Browse to https://datatables.net/download/ and select the DataTables components you wish to utilize
- At the bottom of page select the NPM tab
- Follow the install instructions provided that are based on the components you chose in the first step
As an example of this process we’ll add the DataTable and DataTable Buttons components to our Application Template:
- Open a terminal and execute the following commands:
$ npm install --save datatables.net-bs4 $ npm install --save datatables.net-buttons-bs4 - Next edit the resources/js/bootstrap.js file and add the DataTable import statements to the try/catch block at the beginning of the file as shown below:
try { window.Popper = require('popper.js').default; window.$ = window.jQuery = require('jquery'); require('bootstrap'); // DataTables.net require( 'datatables.net-bs4' )(); require( 'datatables.net-buttons-bs4' )(); } catch (e) { } - Now edit the resources/views/home.blade.php file and replace its contents with the following code:
@extends('layouts.app')

@section('content')
<div class="container">
    <div class="row justify-content-center">
        <div class="col-md-8">
            <div class="card">
                <div class="card-header">Dashboard</div>

                <div class="card-body">
                    @if (session('status'))
                        <div class="alert alert-success" role="alert">
                            {{ session('status') }}
                        </div>
                    @endif

                    You are logged in!
                </div>
            </div>
        </div>
    </div>

    <div class="row justify-content-center mt-5">
        <div class="col-md-8">
            <div class="card">
                <div class="card-header">DataTable Example</div>
                <div class="card-body">
                  <table id="datatable_example" class="table table-striped table-bordered table-hover" style="width:100%">
                    <thead>
                        <tr>
                            <th>Name</th>
                            <th>Position</th>
                            <th>Office</th>
                            <th>Age</th>
                            <th>Start date</th>
                            <th>Salary</th>
                        </tr>
                    </thead>
                    <tbody>
                        <tr>
                            <td>Tiger Nixon</td>
                            <td>System Architect</td>
                            <td>Edinburgh</td>
                            <td>61</td>
                            <td>2011/04/25</td>
                            <td>$320,800</td>
                        </tr>
                        <tr>
                            <td>Garrett Winters</td>
                            <td>Accountant</td>
                            <td>Tokyo</td>
                            <td>63</td>
                            <td>2011/07/25</td>
                            <td>$170,750</td>
                        </tr>
                        <tr>
                            <td>Ashton Cox</td>
                            <td>Junior Technical Author</td>
                            <td>San Francisco</td>
                            <td>66</td>
                            <td>2009/01/12</td>
                            <td>$86,000</td>
                        </tr>
                        <!-- Continue to add as much data as you like here -->
                        <!-- You can visit https://datatables.net/examples/styling/bootstrap4.html for a full example data set -->
                    </tbody>
                    <tfoot>
                        <tr>
                            <th>Name</th>
                            <th>Position</th>
                            <th>Office</th>
                            <th>Age</th>
                            <th>Start date</th>
                            <th>Salary</th>
                        </tr>
                    </tfoot>
                  </table>
                </div>
                <!-- END <div class="card-body"> -->
            </div>
            <!-- END <div class="card"> -->
        </div>
    </div>

</div>
@endsection

@section('js_after')
  <script type="text/javascript">
    $(document).ready(function() {
        //Initialize the DataTable when the page loads
        $('#datatable_example').DataTable();
    } );
  </script>
@endsection
This adds a new card element to the page that holds the DataTable. Inside that element we insert the actual table HTML and data rows, and then we initialize the DataTable when the DOM loads at the end of the page inside the script tags.
- Next terminate the artisan serve process, and execute the following commands in the terminal:
$ npm run dev
$ composer dump-autoload && php artisan cache:clear && php artisan serve
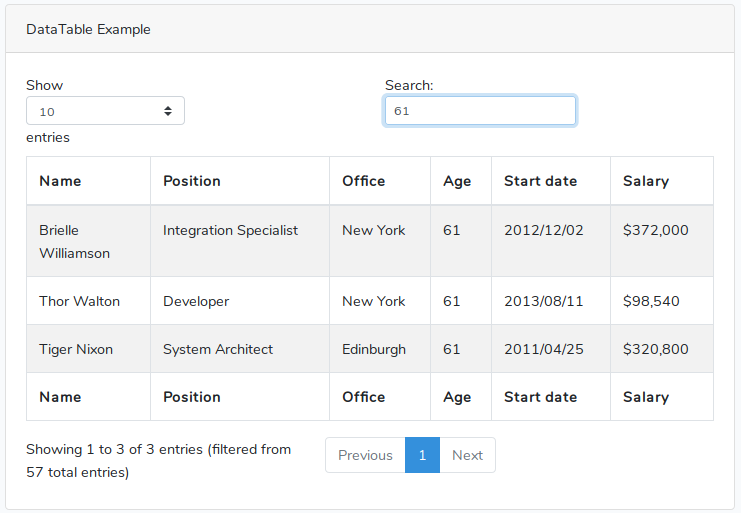
Once you browse to http://localhost:8000/home you should see a new DataTable element in the main content area:

We can observe that the DataTable assets were correctly added to the application template, and that a functional, interactive DataTable element displays in the UI.
Summary
We have now extended the Laravel application base template we started last post with a minimal theme, and we’ve added additional assets such as Font Awesome and DataTable.
This should allow us to use the template for quick starts on projects, or for use with tasks such as interview homework exercises. We should also be able to easily add advanced styling, components, single page applications, etc. without code collisions and bugs with the existing template assets and libraries.
In the next post we’ll implement roles and permissions, as well as work on a User administration CRUD component.
You can find the source code for this post on GitHub.
If you have any comments or questions please don’t hesitate to reach out.
Thanks!


Comments